Leaves (Administrative Feature)
Purpose
This administrative feature can be used to request leaves for other users for back dates & future dates, apply or reject leaves, view leaves and change/ edit leaves of other users. This option is available ONLY for “Manager” & “Admin” type users.
Steps:
Main view -> Click on  drop-down -> Select
  from the drop-down list
Request Leaves For Other Users
Steps:
Step 1: Click on -> Select -> Click on  on main toolbar to open the below window.
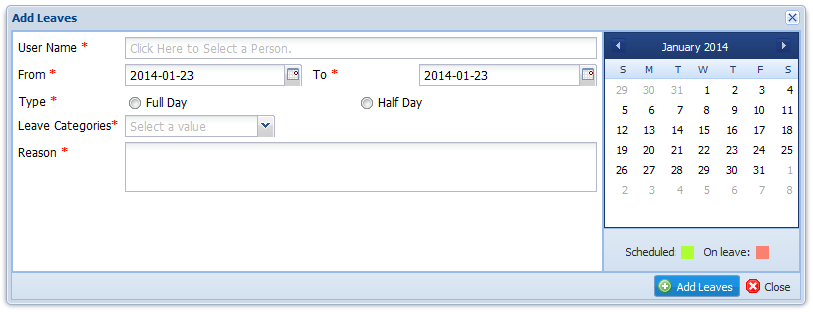
Step 2: Set user name by clicking on the “User Name” text field and select the user from “Select User” window. Click on  button.
Step 3: Set [From] and [To] (optional) dates by clicking calendar icon  at the end of the fields. [To] date field is use when applying for more than one day.
Step 4: Set [Type] field either “Full Day” or “Half Day”
Step 5: Set [Leave Category] field either “Annual”/ “Casual” or “Medical”
Step 6: Write the reason of the leave in the [Reason] field.
Step 7: Click on to add leaves for the selected user OR click on  button to close the window.
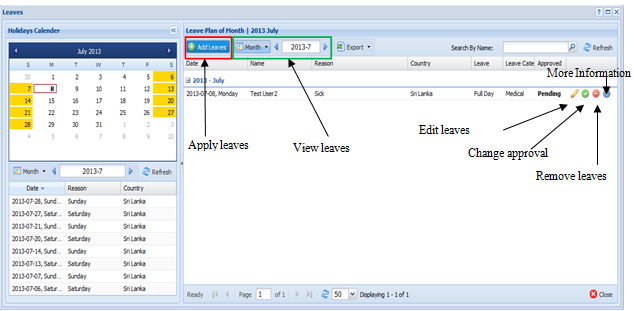
View Leaves of All Users
Steps:
Step 1: Click on -> Select
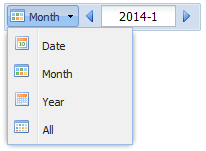
Step 2: Click on  icon to select the view option. Select option as either “Date”/ “Month”/ “Year” or “All” to change the viewing option by month, by year or by all. Default is by month.
For “Year” view, there are two navigation keys 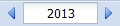 to help the user. Left arrow
  change the view to leaves of previous years, and right arrow
  change the view to leaves of next year’s according to the year displayed between navigation arrow keys.
For “Date” view  , select [Date] from view options. Click down arrow to select a date from calendar to see leave details of that date.
Step 3: Paging bar  will help to limit the number of leaves to be shown. Use down arrow to change the limitations.
Change Other User’s Leaves
Steps:
Step 1: Click on -> Select -> Click on  icon in the action column you wished to change/ edit.

Step 2: Do the necessary modifications in the “Edit Leave” screen.
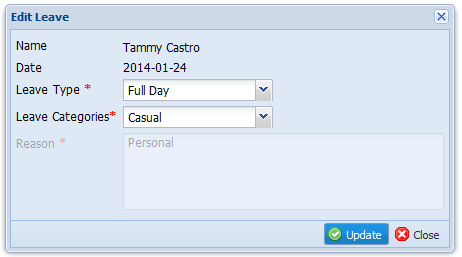
Step 3: Click on  button to save the changes OR click on button to close the window.
Approve or Reject Leaves
Purpose
Through this option managers can apply or reject leaves of their subordinates.
Steps:
Step 1: Click on -> Select -> Click on  icon in the action column.
Step 2: Select the “Approved” to approve the leave or select “Rejected” to reject the leave. Once an employee requests a leave through “My Leaves” option, the leave will be on “Pending” state.
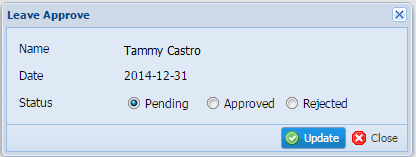
Step 3: Click on button to save the changes OR click on button to close the window.
Note:
Managers/ Admin can approve their own leaves as well using this option.
Delete Other User’s Leaves
Steps:
Step 1: Click on -> Select -> Click on “Remove”  icon in the action column you wished to delete.
Step 2: Click on “Yes” button in the “Remove confirmation” pop-up box to delete the selected leave.
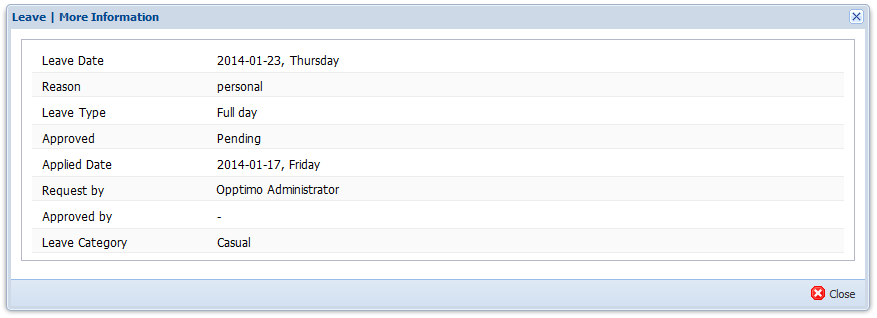
View Details of a Leave
Steps:
Step 1: Click on -> Select
Step 2: Click on “More Information”  icon in the action column to open “Leave | More Information” window.
View Leaves Summary of Others
Admin and Manager level users can view the leave summary of other users in OPPTIMO by following below steps:
Steps:
Step 1: Click on  tab -> Click on “User Details”
  icon in the Job Information Status Box of selected user you need to view leave summary.
Step 2: Click on  tab in the “User Details” window -> Click on
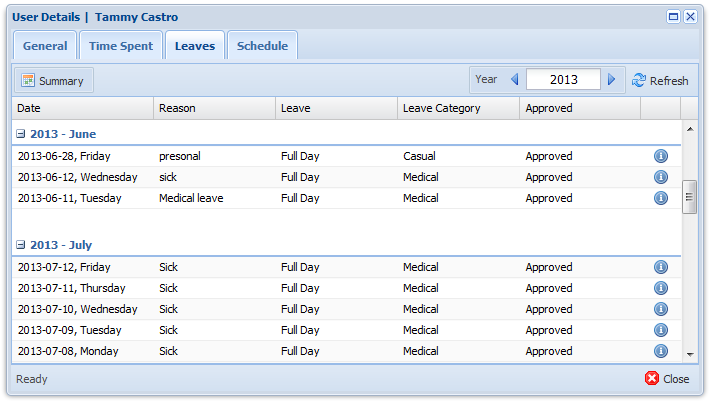
Step 3: Click on “View Details” in-front of each leave to view the more information; such as leave date, reason, leave type, approved or not, applied date, approved person, requested person and leave category of leaves.