Status
Users can view their job status of all members within the organization. This module also facilities followings;
- Add notes to your own job status
- Manage status of your own job tasks
- View user details, time spent on each job task, applied leaves and own job schedule
- Send messages to other users
- Send emails to other users
- Skype with other users
Steps:
Main view -> Click on “Status” tab
Change view type of Status View
User can change the layout (view) either as “Expanded”, “Compact” or “List” by clicking  button. By default, user status details are displayed in expanded view.
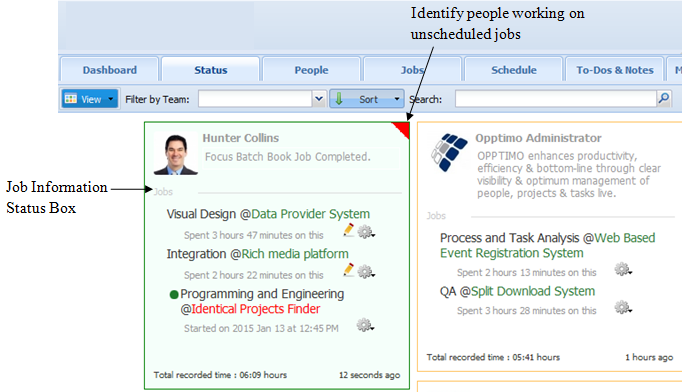
Job Information Status Box
Purpose
Job Information Status Box provides the summary of work done by user within the day. Below are the main components of it.
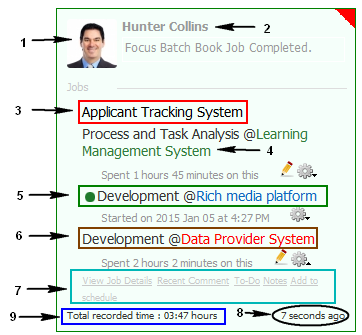
-
User profile picture.
-
User name.
-
Scheduled job – Not work started.
-
Scheduled job – Work started.
-
Currently working job – Users currently working jobs are indicated by
 icon.
icon. -
Worked unscheduled job.
-
Actions for jobs – There are five main actions:
• View Details – To view job details
• Recent Comment – To view comments of job task
• To-Do – To add “To-Dos” items
• Notes – To add Notes for jobs
• Add to Schedule – To add job to user schedule. This action is enabled for unscheduled jobs only.
-
This shows how long ago user log-in to the application.
-
This shows the total amount of time user worked on jobs within the day.
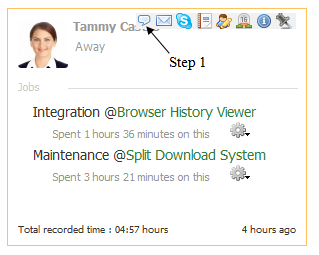
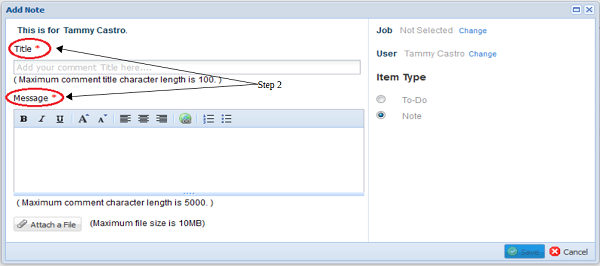
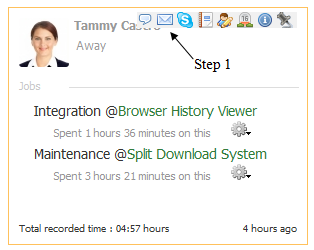
Adding Notes to Your Tasks
Purpose
To add own private notes to your job tasks.
Steps:
Step 1: Go to “Status” tab -> Click on  icon in the Job Information Status Box.
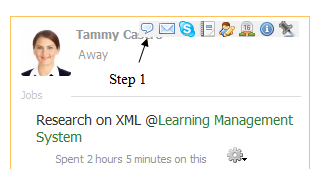
Step 2: Enter the “Title” of the note and type your message in the “Message” text box in the below screen.
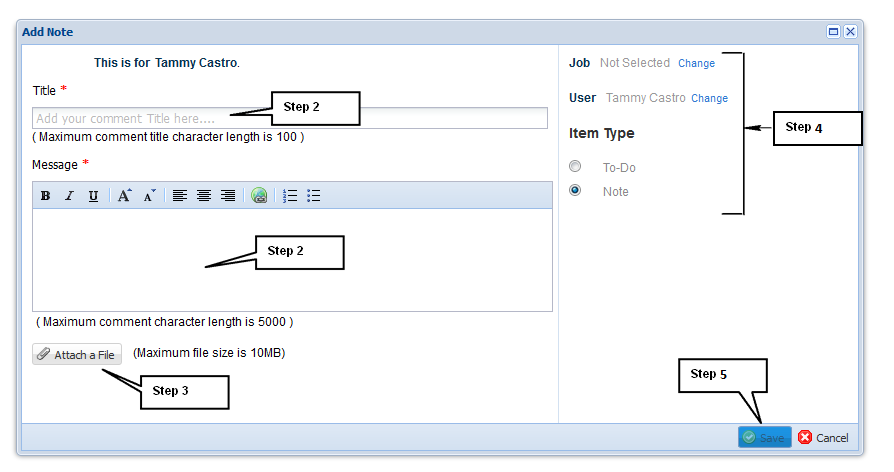
Step 3: User can attach any files to note by clicking on  button -> Click on
  -> Select the file you need to attach -> Click “Open” button
Step 4: User can change the “Job”,” Type of Task”, “User” and the “Item Type” of the note.
Step 5: Click on  button to save the note to the database or click on
  button to cancel the operation.
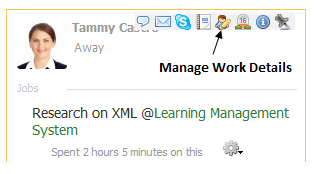
Manage Work Details
Purpose
This option will redirect you to “My Activities”. In “My Activities” window, users can add working job tasks/ activities, change working job, delete job or can comment on jobs.
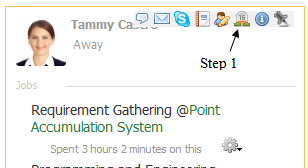
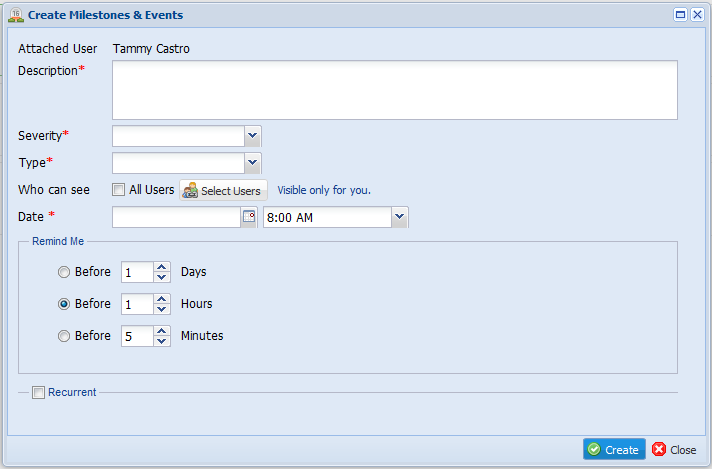
Attach Milestone & Event
Purpose
Attach a Milestones & Event to a specific user.
Steps:
Step 1: Go to “Status” tab -> Click on  icon in the Job Information Status Box.
Step 2: Fill the necessary fields in “Create Milestones & Events” window and click  button.
Note:
Refer “Milestones & Events” section on this manual for detailed steps in adding “Milestones & Events”.
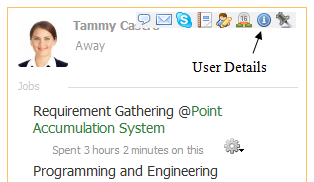
User Details
Purpose
This option enables users to view their user details, time spent on each task (by date/ by jobs/ by task), leaves and schedule of work.
Steps:
Step 1: Go to “Status” tab -> Click on  icon.
icon.
Step 2: User can view general user account information, leaves, and schedules of the log-in user from below window.
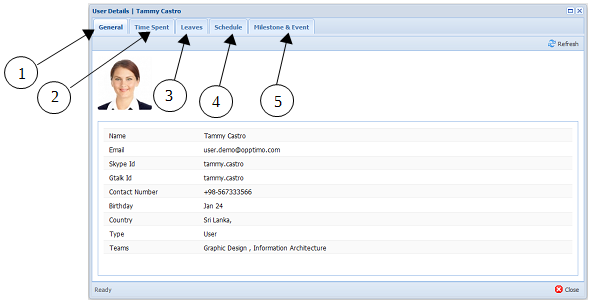
- General – To view user account details of log-in user.
- Time Spent – To view amount of time spent by log-in user. Spent time can be filtered by “By Date”, “By Jobs” and “By Tasks”.
- Leaves – Provide summary of leaves taken by log-in user.
- Schedule – Provide job schedule of log-in user.
- Milestone & Event – This option provides the facility of creating milestones & events for specific user.
Send Messages to Users
Steps:
Step 1: Go to “Status” tab -> Click on  icon in the Job Information Status Box of the user you wish to message.
Step 2: Type your message title and message in the text area displayed in below screen. To attach any files, click on button.
Step 3: Click on button to save the note to the database or click on button to cancel the operation.
Send Emails to Users
Steps:
Step 1: Go to “Status” tab -> Click on  icon in the Job Information Status Box of the user you wish to message.
Step 2: Type the content of the email message and click on “Send” button. (Once you click on , your mail client (ex: Microsoft Outlook / Thunderbird) will get open)
Skype with Users
To Skype with other users, click on  icon in the Job Information Status Box. To use this facility, you must have installed Skype in your computer.
Filtering Users
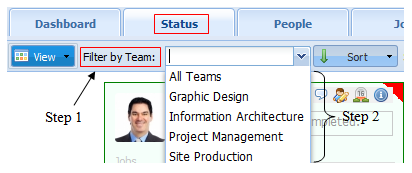
1.“Filter by Teams” option
Purpose
Filter users by teams to view their status
Steps:
Step 1: Go to “Status” tab -> Click on “Filter by Team” drop-down option.
Step 2: Select the team you wish to filter from the list.
2.“Show Only” option
Steps:
Step 1: Go to “Status” tab -> Click on “Show Only” drop-down option.
Step 2: Select the group (i.e. All Users/ Deleted Users/ Online Users/ Not Working Users/ Working Users/ On Leave Users) of users you wish to filter from the list.

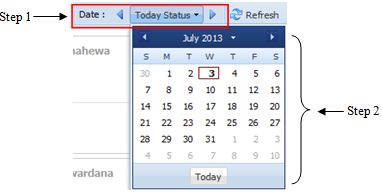
3.“Date” Option
Purpose
To view user’s activity status in past and future dates
Steps:
Step 1: Go to “Status” tab -> Click on “Date” option. By default the system display user status for current date.
Step 2: Select the date you wish to filter from the calendar.
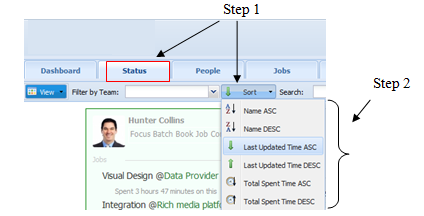
Sort User’s Status
Purpose
To sort user’s status by their “Name”, “Last Update Time” or “Total Time Spent” on job tasks / activities. Sorting can be done in Ascending (ASC) order as well as in Descending (DESC) order.
Steps:
Step 1: Go to “Status” tab -> Click on “Sort” drop-down option.
Step 2: Select the sorting option you wish from the drop-down list.
Pin Users
Purpose
Provide the facility of monitoring the status of tasks/ activities of selected users. You can select users for pin, unpin users and filter pinned users.
How to Pin Users:
Steps:
Step 1: Go to “Status” tab.
Step 2: Click on  icon on the user detail box.
Filter Pinned Users:
Use 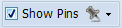 option to filter pinned users.
Unpin Users:
Steps:
Step 1: Select users need to unpin.
Step 2: Click on  icon on user detail box.