Managing Reports
Purpose
“Reports” function allows users to generate pre-defined useful report types such as, People Reports, Job Reports & Other Reports. This option is available only for “Admin” user(s).
Steps:
Step 1: Main view -> Click on  drop-down -> Click
  option

People Reports
People Information Report
Purpose
Source of “People Reports” are users. Based on users, you can generate different reports with various fields according to your reporting requirements.
Steps:
Step 1: Main view -> Click on drop down -> Click button.
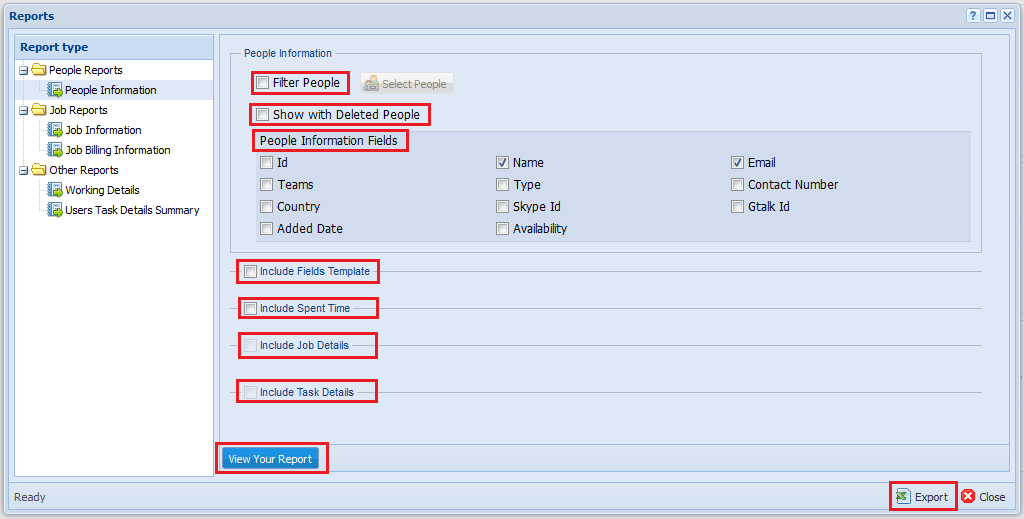
Filter People
Note: If you do not select this option, the report will be generated including the information of all users in the system.
Steps:
Step 1: Go to section -> Click on “People Information” tab -> Click on  button.
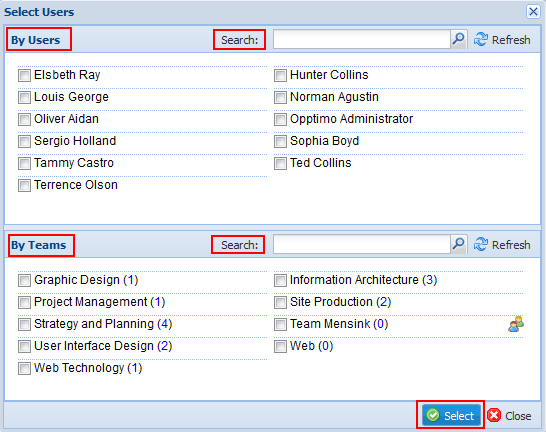
Step 2: Click  button.
Step 3: In “Select Users” window, select users by “Name” or “Teams”
Step 4: Click  button to apply changes.
Show with Deleted People
Purpose
To find the data related to deleted or resigned employees in the Organization
Steps:
Step 1: Go to section -> Click on “People Information” tab.
Step 2: Click on  option to activate this feature in reports.
People Information Fields
Purpose
To include user related information in the generated report.
Steps
Step 1: Go to section -> Click on “People Information” tab.
Step 2: Click on the desired fields under 
Ex:  ,
,  ,
, 
Note: You should at least select one “People Information Field” item to generate the report.
Include Fields Template
Purpose
This option allows users to use “Field Template” information on the report and, to filter fields under each template.
Steps:
Step 1: Go to section -> Click on “Job Information” tab under  section.
Step 2: Click on  button.
Step 3: Select the preferred “Template Fields”
Include Spent Time
Purpose
To calculate user spent time in terms of dates, months, and years.
Note: This will enable “Include Job Details” feature and “Include Task Details” feature.
Steps:
Step 1: Go to section -> Click on “People Information” tab.
Step 2: Click on  button.
Step 3: Select  or
or 
Include Job Details
Purpose
To include job related details into to the report.
Steps:
Step 1: Go to section -> Click on “People Information” tab.
Step 2: Click on  button to proceed.
Step 3: If you wish to select a specific job from the system, click on  button
Note: If you do not choose this option, the report will be generated from the details of all “Jobs” in the system.
Step 4: Select necessary information fields you wish to add in to the report. Ex:  ,
,  ,
, 
Note: You should at least select one “Job Information Field” item to generate the report.
Include Task Details
Steps:
Step 1: Go to section -> Click on “People Information” tab.
Step 2: Click on  button to proceed.
Step 3: Click on  button, to select a specific Task from the system
Note: If you do not choose this option, report will be generated from the details of all “Tasks” in the system.
Step 4: Select necessary information fields you wish to add in to the report. Ex: , ,
Note: You should at least select one “Task Information Field” item to generate the report.
View Your Report
Purpose
To generate an instant preview of the report with the selected fields
Steps
Step 1: Go to section -> Click on “People Information” tab.
Step 2: Select necessary fields and information you require.
Step 3: Click on  button, to view the preview of the report.
Export Report
Purpose
To save your generated report to a computer/ storage disk, for future purposes and to share with others
Steps
Step 1: Go to section -> Click on “People Information” tab.
Step 2: Select necessary fields and information you require.
Step 3: Click on  button in the left bottom of the window.
Step 4: Click on  button in pop-up window to confirm the action.
Job Reports
Job Information Report
Purpose
Source of “Job Reports” are jobs. Based on jobs you can generate different reports with various fields.
Steps:
Step 1: Main view -> Click on drop-down -> Click option.
Step 2: Click on  tab under section.
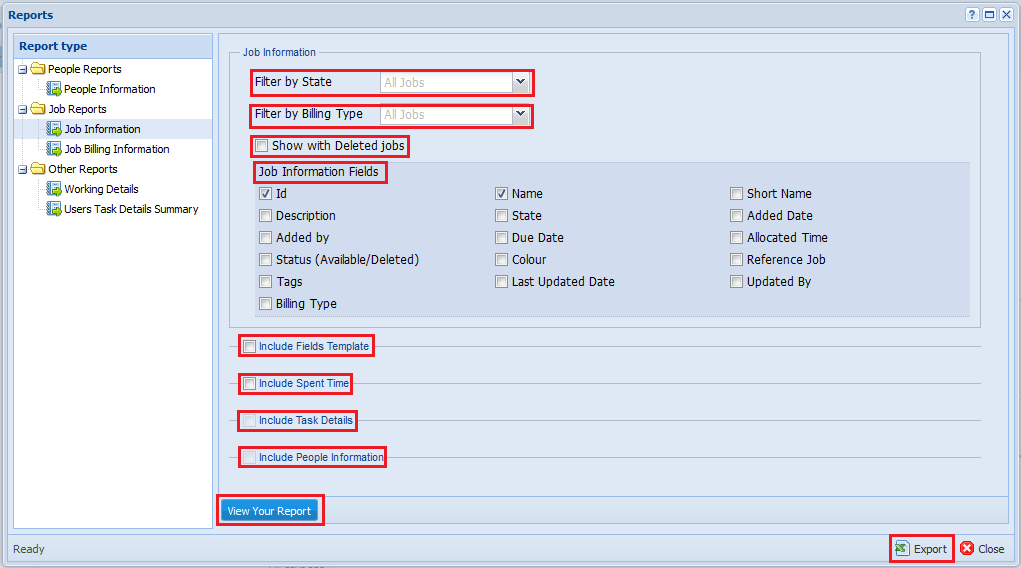
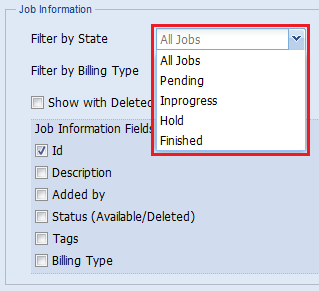
Filter By State
Note: If you do not choose this option, report will be generated from the information of all jobs in the system.
Steps:
Step 1: Go to section -> Click on “Job Information” tab -> Click on
“Filter by State” drop down button.
Step 2: Select a “Job State” from the “Filter by State” drop-down list.
Filter By Billing Type
Note: If you do not choose this option, report will be generated from the information of all jobs in the system.
Steps:
Step 1: Go to section -> Click on “Job Information” tab -> Click on
“Filter by Billing Type” drop down button.
Step 2: Select a “Billing Type” from the “Filter by Billing Type” drop-down list.

Show with Deleted Jobs
Purpose
Users can find the data related to deleted jobs of the Organization using this option.
Steps:
Step 1: Go to section -> Click on “Job Information” tab under section.
Step 2: Click on to activate this feature in reports.
Job Information Fields
Purpose
To include user related information in the generated report
Steps:
Step 1: Go to section -> Click on “Job Information” tab under section.
Step 2: Click on desired fields under  .
.
Ex:  ,
,  ,
, 
Note: You should at least select one “Job Information Field” item to generate the report.
Include Fields Template
Purpose
This option allows users to use “Field Template” information on the report and, to filter fields under each template.
Steps:
Step 1: Go to section -> Click on “Job Information” tab under section.
Step 2: Click on button.
Step 3: Select the preferred “Template Fields”
Include Spent Time
Purpose
To calculate user spent time, in terms of dates, months, and years.
Note: This will enable “Include Task Details” feature and “Include People Information” feature.
Steps:
Step 1: Go to section -> Click on “Job Information” tab under section.
Step 2: Click on button.
Step 3: Select  ,
,  or
or  options, based on your reporting requirement.
Include Task Details
Step 1: Go to section -> Click on “Job Information” tab under section.
Step 2: Click on button to proceed.
Step 3: Click on button to select a specific Task from the system.
Note: If you do not choose this option, report will be generated from the details of all “Tasks” in the system.
Step 4: Select necessary information fields you wish to add in to the report. Ex: , ,
Note: You should at least select one “Task Information Field” item to generate the report.
Include People Information
Note: If you do not choose this option, report will be generated from the information of all users in the system.
Steps:
Step 1: Go to section -> Click on “Job Information” tab -> Click on button.
Step 2: Click button.
Step 3: In “Select Users” window, select users by “Name” or by “Teams”.
Step 4: Click button to apply changes.
View Your Report
Purpose
To view an instant preview of the report with respect to the selected fields
Steps:
Step 1: Go to section -> Click on “Job Information” tab under section.
Step 2: Select necessary fields and information you require.
Step 3: Click on button.
Export Report
Purpose
To save your generated report to a computer/ storage disk or to share with others
Steps:
Step 1: Go to section -> Click on “Job Information” tab under section.
Step 2: Select necessary fields and information you require.
Step 3: Click on button in the left bottom of the window.
Step 4: Click on button in pop-up window to confirm the action.
Job Billing Information Report
Purpose
Job Billing Information reports are unique reports to provide with the Billing Information of jobs.
Job Billing Information reports are generated through job details. Source of “Job Billing Information Reports” are jobs. Based on jobs you can generate different reports with various fields.
Steps:
Step 1: Main view -> Click on drop-down -> Click option.
Step 2: Click on  tab under section.
Filter By State
Note: If you do not choose this option, report will be generated from the information of all jobs in the system.
Steps:
Step 1: Go to section -> Click on “Job Billing Information” tab -> Click on
“Filter by State” drop down button.
Step 2: Select a “Job State” from the “Filter by State” drop-down list.
Filter By Billing Type
Note: If you do not choose this option, report will be generated from the information of all jobs in the system.
Steps:
Step 1: Go to section -> Click on “Job Billing Information” tab -> Click on
“Filter by Billing Type” drop down button.
Step 2: Select a “Billing Type” from the “Filter by Billing Type” drop-down list.
Show with Deleted Jobs
Purpose
Users can find the data related to deleted jobs of the Organization using this option.
Steps:
Step 1: Go to section -> Click on “Job Billing Information” tab under section.
Step 2: Click on to activate this feature in reports.
Job Information Fields
Purpose
To include user related information in the generated report
Steps:
Step 1: Go to section -> Click on “Job Billing Information” tab under section.
Step 2: Click on desired fields under .
Ex: , ,
Note: You should at least select one “Job Information Field” item to generate the report.
Include Fields Template
Purpose
This option allows users to use “Field Template” information on the report and, to filter fields under each template.
Steps:
Step 1: Go to section -> Click on “Job Billing Information” tab under section.
Step 2: Click on button.
Step 3: Select the preferred “Template Fields”
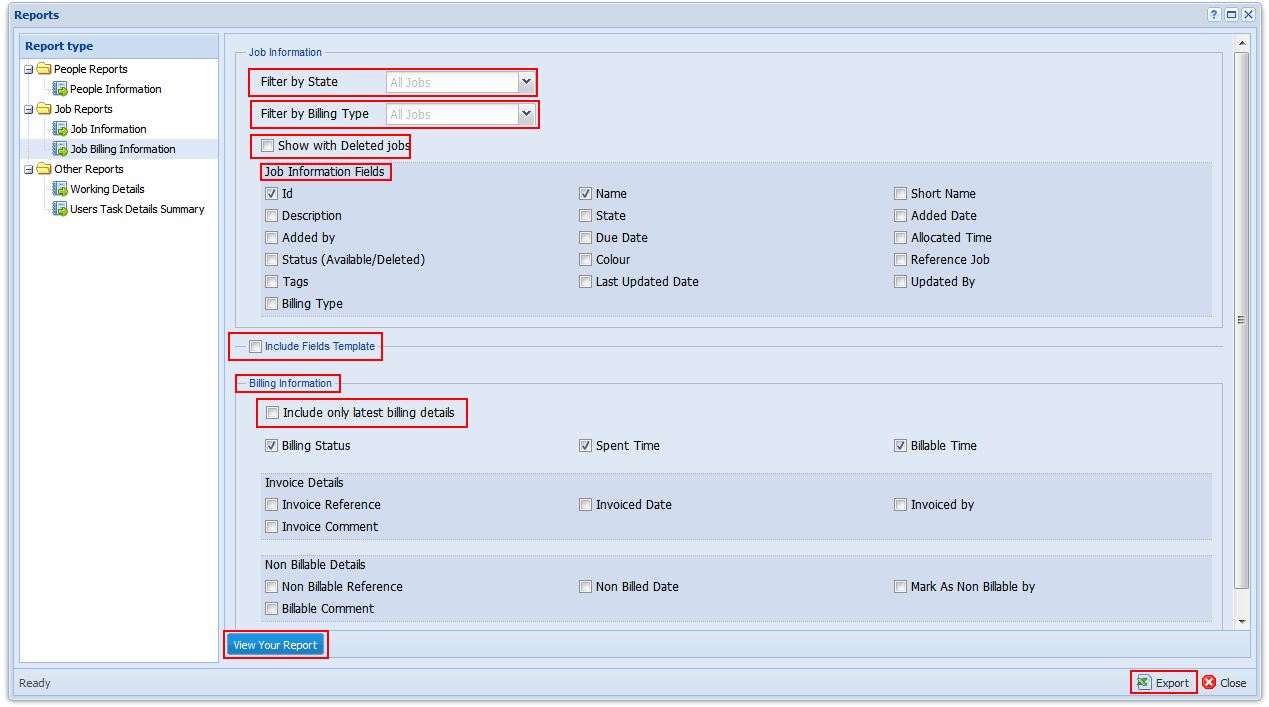
Billing Information
Purpose
This option allows users to generate “Job Billing Information” reports according to different requirements.
Steps:
Step 1: Go to section -> Click on “Job Billing Information” tab under section.
Step 2: Click on preferred fields related to “Invoice Details” & “Non Billable Details”.
Step 3: Select the preferred “Template Fields”

Include Only Latest Billing Details
Purpose
This feature allows users to filter the latest invoice details for each job.
Steps:
Step 1: Go to section -> Click on “Job Billing Information” tab under section.
Step 2: Click on  button.
View Your Report
Purpose
To view an instant preview of the report with respect to the selected fields
Steps:
Step 1: Go to section -> Click on “Job Billing Information” tab under section.
Step 2: Select necessary fields and information you require.
Step 3: Click on button.
Export Report
Purpose
To save your generated report to a computer/ storage disk or to share with others
Steps:
Step 1: Go to section -> Click on “Job Billing Information” tab under section.
Step 2: Select necessary fields and information you require.
Step 3: Click on button in the left bottom of the window.
Step 4: Click on button in pop-up window to confirm the action.
Other Reports
Purpose
“Other Reports” section consists of pre-defined and easy to use reports for generic purposes.
Ex: Working Details Report and Users Task Details Summary Report
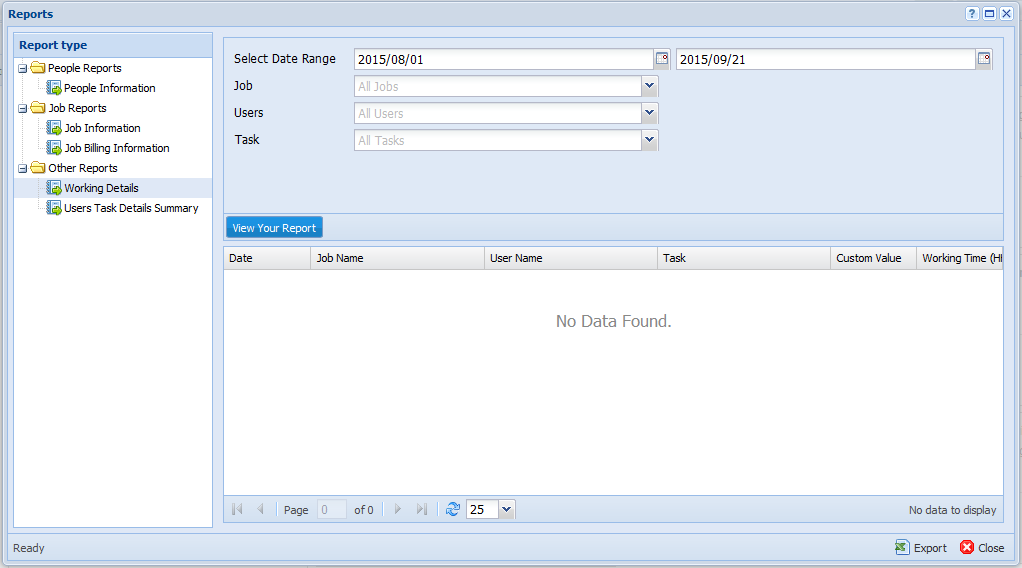
Working Details Report
Purpose
To generate a detail report of work Date, Job Name, User Name, Job Task, and Working Time of users in the system on a specific date range.
Steps:
Step 1: Go to section -> Click on “Working Details” tab under section.
Step 2: Select a <Date Range> for the desired Report.
Step 3: Select a specific “Job” or keep the drop-down with the default option, to continue with “All Jobs”.
Step 4: Select a specific “User” or keep the drop-down with the default option, to continue with “All Users”.
Step 5: Select a specific “Task” or keep the drop-down with the default option, to continue with “All Tasks”.
Step 6: Click on to preview your report.
Step 7: Click on button and to save the report on your computer/ storage disk.
Users Task Details Summary Report
Purpose
To generate a summary report of User Name, Task, and Total Work Time spent for a Task on a specific date range.
Steps:
Step 1: Go to section -> Click on “Users Task Details Summary” tab under section.
Step 2: Select a |<Date Range> for the desired Report.
Step 3: Select a specific “Job” or keep the drop-down with the default option, to continue with “All Jobs”.
Step 4: Select a specific “User” or keep the drop-down with the default option, to continue with “All Users”.
Step 5: Select a specific “Task” or keep the drop-down with the default option, to continue with “All Tasks”.
Step 6: Click on to preview your report.
Step 7:Click on button and confirm to save the report on your computer/ storage disk.